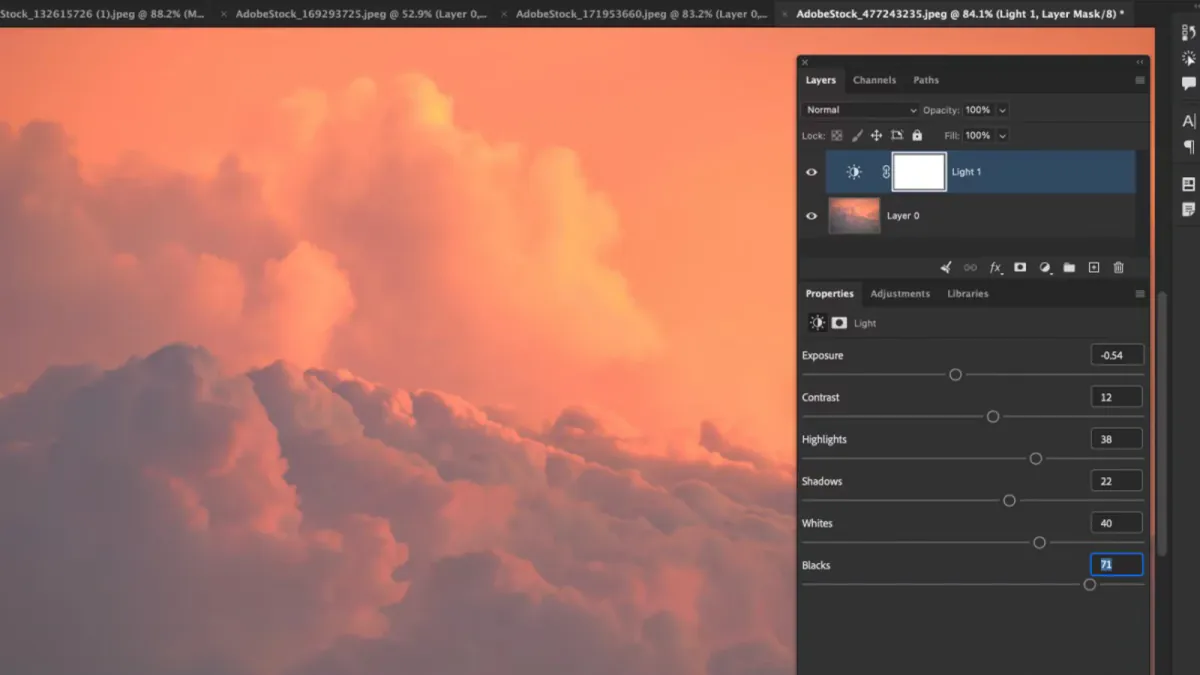
Six Tonal Controls in One Layer
Photoshop 27.10 brings a familiar photographic vocabulary into the Layers panel. Exposure, Contrast, Highlights, Shadows, Whites, and Blacks sit together in the new Light adjustment layer, giving an editor a single place to balance the photograph's tonal structure. Adobe announced the release on August 27 , alongside prompt-directed editing, visual markup, and an optional AI Assisted Editor in beta.
The photographic interest lies in where the controls now live. A tonal decision can remain beside the retouching, masking, and compositing work it supports. Instead of treating brightness as a finishing correction, the editor can keep it visible throughout the construction of the image.
That is the strength of adjustment layers : an interpretation stays separate from the pixels beneath it. The adjustment can be revisited, its reach refined with a mask, and its contribution judged by switching it off and on. In a layered portrait or still life, that separation makes the document easier to read as a sequence of photographic decisions.
Shape the Photograph's Tonal Relationships
The six controls address related but distinct parts of the image. Exposure sets overall brightness, while Contrast changes the separation between lighter and darker areas. Highlights and Shadows address their respective tonal regions. Whites and Blacks concentrate on the brightest and darkest values. Adobe's Light documentation places all six in the Properties panel after Light is selected from the adjustment-layer menu.
A useful starting point is the relationship that gives the photograph its structure. In a window-lit portrait, that might be the illuminated cheek against the room behind it. In a product image, it could be the distinction between a pale object and its background. Begin with that relationship, then refine the surrounding tones. Bringing every shadow forward can flatten the very lighting pattern that made the picture worth taking.
Consider a portrait against a bright wall. One masked Light layer could lift the face, while a second could restrain the background. Naming them for their purpose, such as Face and Wall, makes the intended separation clear. Their settings remain independent, so a later change to the face need not alter the wall.
Texture supplies another useful reference. A white shirt should retain the folds that describe its shape, while black fabric may need just enough separation to distinguish sleeve from torso. The aim is a convincing hierarchy of light, not an evenly bright picture. A deep shadow can be an essential part of the composition.
The layer brings these decisions into the main document without requiring a return to the raw-editing stage. It also sits naturally beside existing Curves, Levels, and masked retouching work. An editor can choose the control that describes the task most clearly, then keep the document organized around those decisions.
How Light Fits Into an Editing Session
Adobe documents one specific behavior worth understanding: Exposure, Contrast, Whites, and Blacks remain live while underlying layers are edited, but using Highlights or Shadows pauses the Light adjustment during work beneath it. The Properties menu also offers legacy Brightness and Contrast versions through the Light version setting.
These details matter when moving between tonal work and retouching. A temporary change in the preview can affect how a brush correction is judged. Return to the completed tonal view when assessing whether a repaired area belongs to the surrounding surface, particularly across a smooth cheek, a seamless backdrop, or a gradual sky transition.
Judge the image at two scales. The full composition shows whether the subject still commands attention and whether bright background details pull the eye away. A closer view reveals abrupt mask transitions, halos, or texture that has become too conspicuous. Those are different questions, and a successful edit answers both.
Light also serves a different purpose from Camera Raw's Glow control. Tonal balance establishes the relationship between bright and dark areas. Diffusion, bloom, and halation shape the appearance of light around detail and highlights. Keeping those intentions distinct helps an editor decide whether an image needs a clearer tonal structure or a particular rendering of atmosphere.
Aim Generative Edits With Words and Selections
The release's generative tools give instructions a location as well as a description. Instruct Edit with Masks uses Firefly Image 5 for selected-area changes. Adobe says it uses the surrounding picture as context while preserving unselected areas. Markup adds drawn shapes, arrows, and color cues to direct the result.
Prompt to Edit addresses an existing image when nothing or the whole image is selected. A partial selection instead leads to Generative Fill. Adobe's selection guide describes the Firefly Image 5 route for localized instructions.
That distinction is useful in a composite: changing the overall setting and altering one selected object are different kinds of direction. A mask identifies the area, a prompt describes the change, and markup can communicate placement. Keeping generated content clearly named in the layer stack makes it easier to compare alternatives alongside conventional tonal adjustments.
The optional AI Assisted Editor is specifically labeled beta. Adobe's 27.10 release thread also includes a September 17 acknowledgment that the company is investigating reports of flickering, incorrect GPU canvas color, and failures when opening images from Lightroom. Those are documented release issues, separate from the purpose of the Light layer.
For photographers, the central change is straightforward: six familiar tonal controls now belong to the layered image itself. The file can hold both the finished appearance and the editable decisions that give it shape.